
Wall Hung Toilet Installation Guide: Step-by-Step for Indian Bathrooms
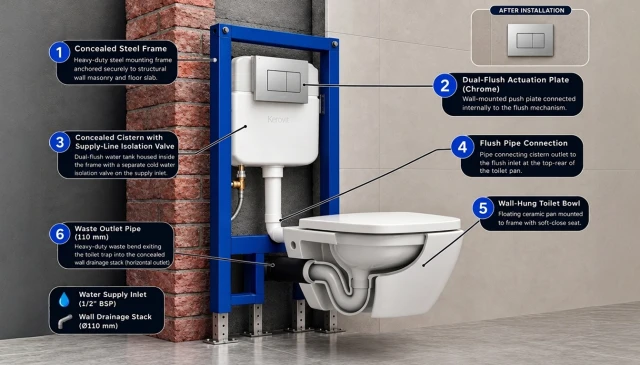
Installing a wall hung toilet seat isn't a weekend DIY job - and getting it wrong is expensive to undo. Because the cistern and mounting frame sit hidden inside the wall, most installation mistakes only surface after tiling is complete, when fixing them means breaking through finished walls. This guide walks through what a wall mounted toilet seat installation actually involves, so you know what to expect from your plumber and what to check before work begins.
Why Wall Hung Toilet Installation Needs Careful Planning
A wall hung toilet seat looks simple from the outside: a floating bowl, no visible cistern, a clean wall line. But underneath, it depends on a concealed frame - a steel or reinforced-plastic structure bolted into the wall - that carries the entire weight of the toilet and the person using it. Floor-mounted toilets transfer weight straight to the floor slab; wall hung units transfer it sideways into the wall structure instead.
This is why installation sequencing matters more here than with a standard western toilet. The frame has to go in before tiling, the plumbing has to be pressure-tested before the wall is closed up, and the wall itself needs to be strong enough to take the load. Skipping any of these steps is the single biggest reason wall hung installations need rework.
Tools & Materials Needed
A standard installation requires:
- Concealed cistern frame (in-wall installation system) rated for wall hung use
- Dual-flush cistern with flush plate
- Wax ring or rubber gasket for the outlet connection
- PVC/CPVC pipe fittings for waste and supply lines
- Masonry drill with appropriate bits (for RCC or brick walls)
- Spirit level, measuring tape, and a stud/wall scanner
- Torque wrench for frame bolts
- Silicone sealant and grout (post-tiling)
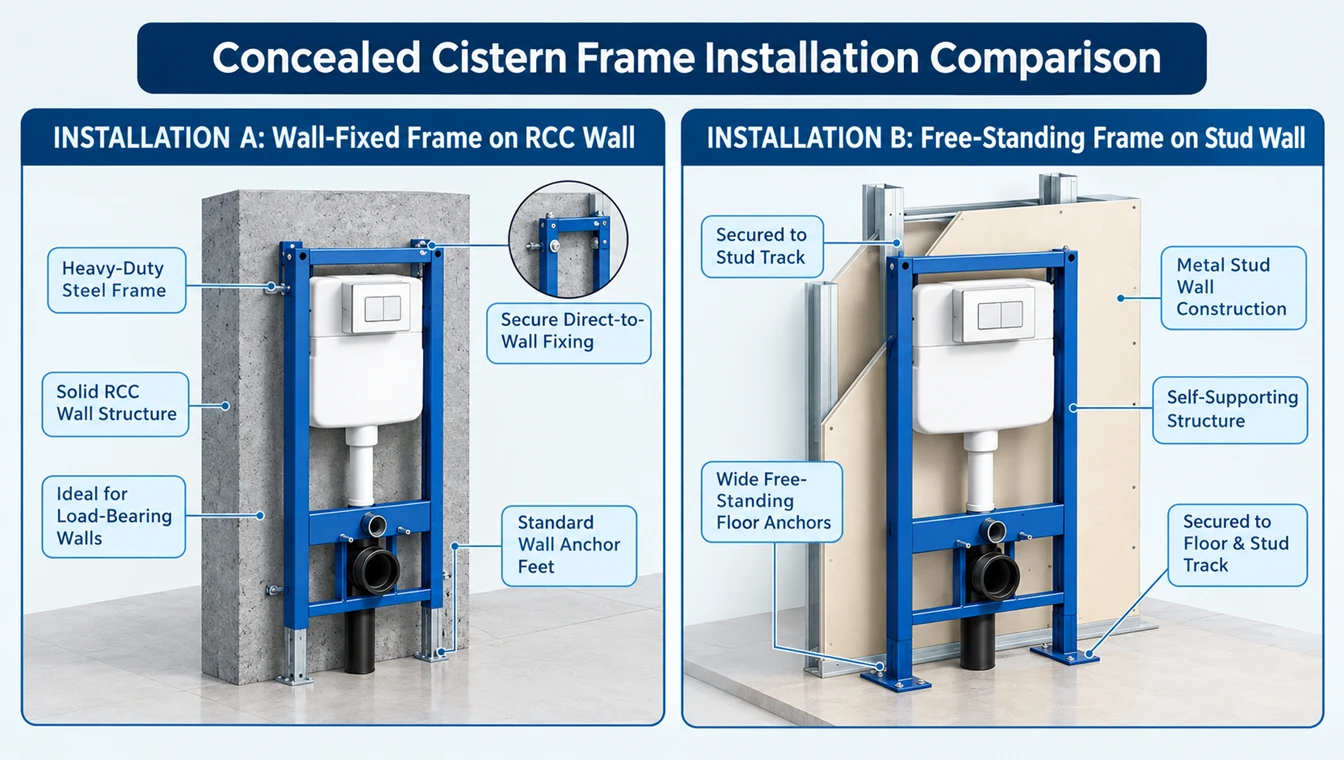
For stud-partition bathrooms, a free-standing frame with its own support legs is used instead of a wall-fixed bracket, since drywall or stud walls alone typically cannot bear the load. Kerovit's entire wall hung toilet seat range is compatible with this free-standing frame approach, so stud-wall bathrooms aren't restricted to a limited set of models - the choice comes down to the frame system, not the toilet itself.
Wall Strength & Frame Requirements
This is the step most installers get wrong, and it's non-negotiable. Concealed frames for wall hung toilets are commonly rated to carry loads of around 450 kg (approximately 880 lb) of static weight, with some premium frame systems rated higher. This rating needs to be verified against the specific frame and cistern combination being installed, not assumed from a generic figure.
A few structural checks matter before installation starts:
- Solid backing wall: RCC (reinforced cement concrete) or dense brick masonry is preferred for direct wall-fixed frames. A wall thickness of at least 100 mm (about 4 inches) is typically needed to anchor bolts securely.
- Frame anchoring: Bolts should sit in structural masonry, not just plaster or tile backing board.
- Free-standing frame option: For stud or partition walls, a floor-anchored frame removes the dependency on wall strength entirely, since the load goes to the floor instead.
Getting this step verified by a structural or plumbing professional before work begins is the cheapest insurance against a toilet that works loose within a year.
Concealed Cistern Fitting Steps
Once the wall type is confirmed, installation typically follows this sequence:
- Mark and position the frame at the correct height - the bowl outlet is usually set so the finished seat height sits around 40–42 cm (16–16.5 inches) above the floor, matching standard ergonomic western toilet seating.
- Anchor the frame to the wall or floor per the manufacturer's torque specification for the bolts.
- Connect the waste outlet from the frame's built-in bend to the main soil pipe, checking the fall (slope) is adequate to prevent blockages.
- Install the cistern unit into the frame and connect the water supply line.
- Pressure-test the cistern and supply line before closing up the wall - this is the step most often skipped, and the one that causes leaks discovered only after tiling.
- Close the wall with cement board or brickwork, leaving the flush plate access panel exposed.
- Tile and finish the wall, then mount the flush plate.
- Attach the bowl to the frame's mounting studs and connect it to the concealed outlet with a gasket seal.
Plumbing Connections Explained
Two separate plumbing lines feed into a wall hung toilet: the waste line (taking wastewater to the drain/soil pipe) and the water supply line (filling the cistern). The waste connection uses a flexible or rigid outlet bend built into the frame, sealed against the bowl with a gasket to prevent leaks and odour.
The supply line should include an isolation valve inside the wall cavity, accessible only through the flush plate service panel - this lets a plumber shut off water for future servicing without breaking tiles. Indian plumbing codes generally recommend CPVC or reinforced piping for supply lines given typical water pressure and temperature conditions; existing site plumbing standards should be followed for material compatibility.
Common Mistakes to Avoid
- Skipping the pressure test before tiling - the single most expensive mistake, since a leak means removing tiles to access the wall cavity.
- Wrong wall type assumption - fixing a frame to a stud or drywall partition without the free-standing leg support.
- Incorrect seat height - not accounting for tile thickness when marking the frame position, leaving the bowl too high or low.
- Inadequate waste line slope - a flat or reverse-sloped waste connection causes recurring blockages.
- Ignoring access panel placement - positioning the flush plate where it's hard to service later.
Choosing the Right Wall Hung Toilet: Kerovit's Range
Kerovit's wall hung toilet seat range is built for exactly this kind of installation, with frame-compatible bowl designs across one-piece and extended wall-hung options. The concealed cistern approach pairs naturally with smaller Indian bathroom footprints, since the floating design keeps floor space visually open and makes cleaning underneath the bowl considerably easier - a practical benefit alongside the aesthetic one.
Before finalising a model, it's worth pairing your toilet choice with co-ordinated washbasins that share the same design language, and checking Kerovit's complete bathroom fittings collection for matching accessories. If you're still deciding between mounting styles, our wall hung vs floor mounted toilet comparison breaks down which suits different bathroom layouts.
Frequently Asked Questions
Q: Can a wall hung toilet be installed on any wall?
A: No. It needs either a solid RCC/masonry wall strong enough to anchor the frame, or a free-standing frame with floor-anchored support legs for stud or partition walls.
Q: How much weight can a wall hung toilet frame hold?
A: Concealed frames are commonly rated around 450 kg (992 lb) of static load, though this varies by frame model and should be confirmed against the specific product being installed.
Q: Is a wall hung toilet harder to repair than a floor-mounted one?
A: Day-to-day servicing is done through the flush plate access panel, so it's not harder in practice - but any issue with the frame itself requires opening the wall, which is why correct installation matters more upfront.
Q: How long does wall hung toilet installation take?
A: Frame and plumbing installation typically takes a day, but the wall then needs to be tiled and finished before the bowl and flush plate go in, extending the full process across the broader bathroom renovation timeline.
Q: Does a wall hung toilet save bathroom space?
A: Yes. With the cistern concealed inside the wall and the bowl floating above the floor, it visually opens up small bathrooms and makes floor cleaning easier compared to a floor-mounted toilet.
Conclusion
A wall hung toilet installation is only as good as the wall behind it - get the frame anchoring and pressure-testing right, and the rest of the process is straightforward. If you're planning a bathroom renovation, loop in your plumber early on the wall type question, since it decides which frame system you need before any tiling begins. Explore Kerovit's wall hung toilet seat range to find a design that fits your bathroom layout and installation type.